


Section 01Understanding Door Dimensions
Before measuring, you need to understand the three different size references used in door installations. Confusing these measurements is one of the most common causes of ordering errors.
1. Rough Opening (R.O.)
The rough opening is the structural framed opening in the wall, measured from stud-to-stud horizontally and from subfloor-to-header vertically. This is the measurement you'll use when ordering a pre-hung door. The rough opening provides space for the door frame plus shimming room for leveling and plumbing the installation.
2. Frame/Jamb Size
The frame size (also called unit size) includes the door jamb that fits within the rough opening. Frame size is typically ½″ to 1″ smaller than the rough opening on each side to allow for shimming. When you order a pre-hung door by door size, the manufacturer calculates the appropriate frame size.
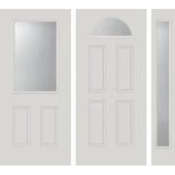
3. Door Slab Size
The door slab is the door itself, without the frame. It's smaller than the frame opening to allow for a ⅛″ reveal (gap) around all sides for proper operation. When replacing just the door slab in an existing frame, measure the existing door precisely.
| Measurement Type | What It Measures | Typical Relationship |
|---|---|---|
| Rough Opening | Stud-to-stud, subfloor-to-header | Door size + 2″ to 2½″ each direction |
| Frame / Unit Size | Outside of jamb to outside of jamb | Door size + approximately 1″ |
| Door Slab | The door panel itself | Nominal size (e.g., 36″ × 80″) |
Section 02Tools & Equipment Checklist
Having the right tools ensures accurate measurements. Gather these before you begin.
Essential Tools
- 25-foot retractable tape measure with a stiff metal blade
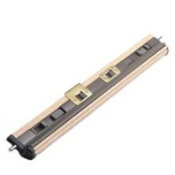
- 6-foot level for checking plumb (vertical alignment)
- 2-foot level or torpedo level for horizontal surfaces
- Pencil and notepad for recording measurements immediately
- Utility knife for removing caulk if needed
- Pry bar for carefully removing interior trim/casing
- Wide putty knife to protect wall surfaces during trim removal
Recommended Extras
- Laser distance measurer for tall openings
- Framing square to verify 90° corners
- Flashlight to illuminate shadowed areas
- Camera or smartphone to document existing conditions
- A helper to hold tape measures and verify readings
Section 03Step-by-Step Measurement Instructions
Step 1: Prepare the Opening
For replacement doors, you must remove the interior trim (casing) to access the true rough opening. Measuring an installed door or frame will not give you accurate rough opening dimensions.
- Use a utility knife to score along the caulk line between the trim and wall to prevent paint tearing.
- Insert a wide putty knife behind the trim to protect the wall surface.
- Carefully pry off the trim using the pry bar, working from one end to the other.
- Remove any insulation or debris from the gap between the frame and rough opening.
- Inspect the rough opening for rot, damage, or previous modifications.
Step 2: Measure the Width
Take three width measurements to account for any irregularity in the opening:
Record the smallest measurement. This ensures your door will fit at the narrowest point.
Step 3: Measure the Height
Take two height measurements:
Record the smallest measurement. If you're installing over existing flooring, also note the finished floor height for threshold planning.
Step 4: Measure the Wall Thickness (Jamb Depth)
Wall thickness determines the jamb depth you need. Measure from the exterior wall surface to the interior wall surface at six points — top, middle, and bottom on both sides.
Record the largest measurement. Unlike width and height, you want the jamb to cover the thickest part of the wall. If your measurement falls between standard sizes, order the next size up.
| Wall Construction | Typical Thickness | Standard Jamb Depth |
|---|---|---|
| 2×4 wall with ½″ drywall | 4½″ | 4-9/16″ |
| 2×4 wall with stucco exterior | 5″ to 5½″ | 5-1/4″ or 5-1/2″ |
| 2×6 wall with ½″ drywall | 6½″ | 6-9/16″ |
| Older homes with plaster | 5″ to 6″ (varies) | Measure carefully |
Step 5: Check for Square and Plumb
An out-of-square or out-of-plumb opening can cause significant installation problems.
Checking for Square (Diagonal Method)
Measure diagonally from the top-left corner to the bottom-right corner, then from the top-right to bottom-left. If the two measurements match within ¼″, the opening is square. Larger variances may require frame modification.
Checking for Plumb (Vertical)
Place a 6-foot level against each side jamb stud. Maximum acceptable deviation is ⅛″ to ¼″ over the height of the opening.
Checking for Level (Horizontal)
Place a level across the threshold/sill area and across the header. Note any deviation from level.
Section 04Standard US Door Sizes Reference
These are industry-standard dimensions. Always verify with your specific door manufacturer before ordering.
Single Entry Door Sizes
| Door Size (W × H) | Rough Opening | Common Applications |
|---|---|---|
| 30″ × 80″ | 32″ × 82″ | Secondary entrances, older homes |
| 32″ × 80″ | 34″ × 82″ | Side entries, budget installations |
| 34″ × 80″ | 36″ × 82″ | Standard older home front entries |
| 36″ × 80″ | 38″ × 82″ | Most common front door size |
| 36″ × 84″ (7′) | 38″ × 86″ | Newer construction, taller ceilings |
| 36″ × 96″ (8′) | 38″ × 98″ | Grand entrances, modern homes |
| 42″ × 80″ | 44″ × 82″ | Oversized entries, accessibility |
Double Door Configurations
| Configuration | Unit Width | Rough Opening Width |
|---|---|---|
| Two 30″ doors | 60″ | 62″ |
| Two 32″ doors | 64″ | 66″ |
| Two 36″ doors | 72″ | 74″ |
| One 36″ + one 24″ (unequal) | 60″ | 62″ |
Door with Sidelights
| Configuration | Approx. Unit Width | Notes |
|---|---|---|
| 36″ door + one 12″ sidelight | 51″ | Add 3″ for trim |
| 36″ door + one 14″ sidelight | 53″ | Add 3″ for trim |
| 36″ door + two 12″ sidelights | 63″ | Add 3″ for trim |
| 36″ door + two 14″ sidelights | 67″ | Add 3″ for trim |
Standard Door Thickness
| Door Type | Standard Thickness | Notes |
|---|---|---|
| Exterior entry doors | 1-3/4″ | Industry standard for security and insulation |
| Interior doors | 1-3/8″ | Lighter weight for interior use |
| Heavy-duty / insulated exterior | 2″ to 2-1/2″ | High-performance options |
Now that you know your rough opening dimensions and the standard door size that fits, you can start shopping. Browse our full collection of exterior entry doors — including fiberglass, steel, and solid mahogany options — or use the Door Configurator to build a complete door system matched to your exact measurements.
Section 05Special Situations & House Types
New Construction vs. Replacement
New Construction
You have direct access to rough framing before walls are closed. Use the formula: door size + 2″ to 2½″ in both width and height.
- Verify R.O. against your door order before drywall
- Ensure headers are properly sized for opening width
- Check that jack studs and king studs are plumb
Replacement / Retrofit
Requires more detective work. You must expose the rough opening to get accurate measurements.
- Remove interior trim to expose the true R.O.
- Check for rot, termite damage, or past modifications
- Verify plumb and square — settling may have shifted it
- Allow contingency budget for unexpected repairs
Older & Historic Homes
Homes built before 1950 often have non-standard door sizes. Common challenges include doors as narrow as 30″–32″ (vs. today's 36″ standard), heights of 78″ instead of 80″, thinner 1-3/8″ slabs, significant settling, and balloon framing with different settling patterns.
Solution: Take extra-detailed measurements and consider custom door sizing. Many manufacturers offer extensive size options that can accommodate historic dimensions. Document everything carefully — custom orders cannot be returned.
Architectural Styles
| Style | Typical Door Size | Special Considerations |
|---|---|---|
| Colonial / Traditional | 36″ × 80″ single | Standard sizing, symmetrical facade |
| Craftsman / Bungalow | 36″ to 42″ wide | Often includes sidelights, art glass. See our Craftsman-style fiberglass and mahogany Craftsman doors. |
| Victorian | Narrow but tall | May approach 8′ height, arched transoms. Mahogany doors with divided lite glass complement the style. |
| Contemporary / Modern | 36″ to oversized | Pivot doors can reach 18′ × 9′ |
| Mediterranean / Spanish | Custom sizing | Arched tops, double doors common |
Regional & Climate Considerations
Coastal / Hurricane Zones
Doors in Florida's High Velocity Hurricane Zones (Miami-Dade and Broward Counties) must be rated for 170–200 mph winds with large missile impact testing. Wind-Borne Debris Regions within one mile of the coast where wind speeds exceed 130 mph require impact-resistant glass. These specialized doors may have different sizing requirements.
Cold Climates
Northern climates prioritize thermal performance with R-5 or higher insulation values. Homes in these areas often have 2×6 walls requiring 6-9/16″ jamb depth rather than the standard 4-9/16″. Account for this when measuring jamb depth.
Flood Zones
FEMA regulations require elevated thresholds in flood zones. In Zone AE, living space must be at minimum 1 foot above Base Flood Elevation. Measure carefully and verify local requirements.
Section 06Pre-Hung vs. Slab Doors
Pre-Hung Doors
Arrives with the slab mounted on hinges within a complete frame, including jambs, weatherstripping, and often a threshold.
What to Measure
- Rough opening (stud-to-stud, subfloor-to-header)
- Wall thickness for correct jamb depth
- Swing direction (left or right-hand)
- Hinge side (viewed from outside looking in)
Best For
- New construction
- When existing frame is damaged
- Exterior doors requiring weather sealing
Slab Doors
The door panel only, without frame, hinges, or hardware. Costs less but requires precise measurement and more installation skill.
What to Measure
- Existing slab height, width, and thickness — match exactly
- Hinge locations from top and bottom of door
- Lockset hole position (backset: 2-3/8″ or 2-3/4″)
- Deadbolt position if applicable
Best For
- Budget-conscious replacement
- When existing frame is in good condition
- Custom or vintage installations
| Factor | Pre-Hung / Door System | Slab Only |
|---|---|---|
| Typical Cost | Varies by configuration (see below) | $407 – $3,249 depending on material |
| Installation Skill | Moderate | Advanced |
| Measurement Focus | Rough opening | Exact door dimensions |
| Frame Condition | Doesn't matter (replaced) | Must be sound |
| Weather Sealing | Integrated | Relies on existing frame |
What Do Entry Doors Actually Cost?
If you're replacing just the door slab and your existing frame is in good condition, individual slabs at Pease Doors start at $407 for a steel 6-panel door. Fiberglass slabs — which offer better insulation and don't dent — range from $509 for a classic 6-panel to $611 for a Craftsman 3-panel. For a premium solid wood look, our hand-crafted Brazilian mahogany slabs start at $999, with glass options like the V-Groove half lite and ¾ glass 6-lite at $1,599.
However, buying a slab means you still need to source framing, weatherstripping, a threshold, hardware, and hinges separately — which adds up quickly and introduces the risk of compatibility issues.
Section 07Measuring for Sidelights & Transoms
Adding sidelights or transoms significantly expands the rough opening requirements and may introduce structural considerations that require professional evaluation.
Sidelight Measurements
Standard sidelight widths are 12″ and 14″, built in 2-inch increments. To calculate the rough opening width for a door with sidelights:
- Start with your door width (e.g., 36″)
- Add sidelight width(s) — e.g., 12″ each side = 24″
- Add approximately 3″ for trim and framing between units
- Add 2″ for rough opening shimming space
Example: A 36″ door with two 12″ sidelights requires a rough opening of approximately 64-3/8″ wide.
Transom Measurements
Standard transom height is 12″ with 13½″ total unit height including framing. Custom transoms can reach 24″ but nothing larger. For balanced proportions, the transom should be ⅓ to ¼ of the door height. Account for approximately 1½″ of transom frame above the door frame, and verify structural capacity for wider headers.
Section 08ADA Accessibility Requirements
The Americans with Disabilities Act establishes specific door requirements for commercial buildings, public facilities, and certain residential buildings. Even if not legally required, these standards provide excellent guidance for universal design.
Clear Width
Minimum clear width is 32″ (measured from face of door to door stop when open 90°), with a 48″ maximum. For openings deeper than 24″, minimum clear width increases to 36″. A standard 36″ door provides approximately 32″ of clear opening.
Threshold
Maximum threshold height is ½″ for new construction. Thresholds above ¼″ must have a beveled edge. Exterior sliding doors or altered thresholds allow up to ¾″.
Hardware
Hardware must be mounted 34″ to 48″ above the floor and must be operable with one hand without tight grasping, pinching, or twisting. Round doorknobs are not compliant — lever handles are required. Interior hinged doors require a maximum of 5 pounds of force to open.
Where ADA Applies
- All commercial and public facilities built after January 26, 1992
- State and local government facilities
- Multi-family housing with 4+ units first occupied after March 13, 1991
- Elevator buildings: all units must meet accessibility requirements
- Buildings without elevators: all ground-floor units must comply
Section 09Common Measurement Mistakes to Avoid
| Mistake | Problem It Causes | How to Avoid |
|---|---|---|
| Measuring at only one point | Door too large or uneven gaps | 3 points for width, 2 for height |
| Measuring the existing door slab | Ordering wrong size | Remove trim; measure rough opening |
| Forgetting flooring changes | Door drags or excessive gap | Measure from subfloor; account for new flooring |
| Ignoring wall thickness variations | Jamb doesn't cover wall properly | Measure at 6 points; use largest |
| Not checking for square | Installation problems, gaps | Measure both diagonals |
| Mixing up width and height | Wrong door ordered | Always record as W × H; double-check |
| Wrong swing direction | Door opens wrong way | Verify from outside looking in |
| Ordering R.O. size as door size | Door 2″ too small | Understand the difference between measurements |
Section 10Measurement Worksheet
Use this interactive worksheet to record your measurements. The form automatically identifies the correct value to use for ordering.
Door Measurement Worksheet
Enter your measurements below. Results update automatically.