


Weather Stripping Installation and Buying Guide
Key Pictures/Diagrams
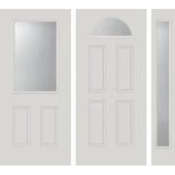
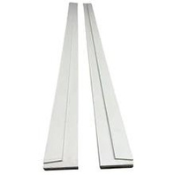
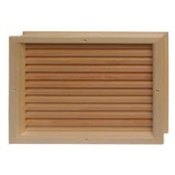
Standard Magnetic Weatherstrip (what most people need)
Comes in 3 piece set: 81” magnetic (for lock jamb), 81” compression (for hinge jamb), 40.5” magnetic (for head jamb)


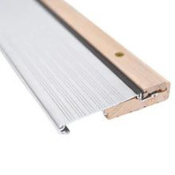
Weatherstrip - how installs into jamb

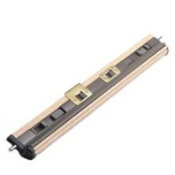
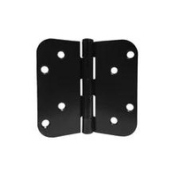
Corner Seal

Purpose/Function
Weatherstripping seals the door against the lock jamb, head jamb, and hinge jamb. Proper weatherstripping seals against drafts and pests and helps the door close firmly and smoothly. Corner seals (also known as corner pads) are often used in conjunction with weatherstripping to ensure a full seal in the corners.
Material/Construction
For residential doors, weatherstripping is typically made of vinyl coated foam or thermoplastic rubber. Vinyl coated foam is the cheaper of the two materials and so is often used in new construction. On commercial doors, other types of weatherstripping can be found, including brushes or bristles.
Some premium weatherstripping has a magnet embedded in the head and lock jambs. This helps create a refrigerator-like seal with the metal face (or, on some wooden/fiberglass doors, a metal strip on the lock/top edge).
For residential doors, weatherstripping is typically sold in long (~81”) extruded strips. These strips have a bulb portion that compresses and seals when the door pushes against it and a barb portion that allows the weatherstripping to be installed into the kerf (or slot) in the jambs. Most jambs have a ~1/8” kerf. Some jambs (typically steel jambs for some high-rated fire doors) have a wider kerf (~1/4” slot).
Our product offering
Magnetic weatherstripping set (only available in brown)
- Fits wood jambs with 1/8” kerf or slot
- Each set comes with a long magnetic strip for the lock jamb, a long compression (non-magnetic)
- Made of high quality thermoplastic rubber that will form a tight seal in extreme heat/cold and is durable enough to withstand many thousands of door opening/closing cycles
- If ordered in quantities of 2 or more, the head jamb piece will come as a long 83” strip, so that you can install into a double door as needed (if you have a two single doors just cut in half)
- Fits a ¼” gap
High reach weatherstripping (available in white and bronze)
- Same as the standard weatherstripping above except that this has a larger “bulb” portion and helps to seal older doors that may be slightly out of alignment (for example, if you can see medium ~1/16” to ¼” gaps of daylight around the edges of you door – if you see larger gaps than that you should try to adjust your door i.e., by shimming your hinges or the door may need to be replaced
- Fits up to ⅝” gap
Corner seals/corner pads (available in white, bronze, and beige)
- Tucks behind weatherstripping in the corners and helps seal these areas
- Most effective/important in the bottom lock-side corner, as this is where most doors have slight “hard to seal” gaps that let in pests/drafts. However, we recommend that all doors use corner seals on the both bottom corners and on top corners where daylight can be seen after installing fresh weatherstrip
- Multiple corner pads can be used in a corner that still has a gap after a single corner pad has been installed. Corner pads can be stacked vertically along the door jamb or on top of each other to create a single “thick” corner pad
Replacement cycle
We recommend replacing weatherstripping and corner pads every 5-10 years, depending on use (if the door is used more frequently, the weatherstripping should be replaced more often). If you live in a hot/cold climate with high energy costs, we recommend replacing more frequently as weatherstripping is the most economical way to boost the energy efficiency of your home. We also suggest replacing vinyl weatherstripping with thermoplastic rubber, as it will last longer and perform better. Weatherstripping should also be replaced if it becomes frayed or torn (sometimes pets like to chew/scratch weatherstripping and this can necessitate more frequent replacement!).
Installation instructions
A. Weatherstripping
- Fully open door, pull out your old weatherstrip and set aside/discard
- Identify the magnetic and compression strips. You have three new pieces (two magnetic, one compression) that will be a perfect fit for wooden jambs with 1/8” kerf (cut or groove). From either end, look at the end profile for a magnetic strip to see if it’s a compression or magnetic piece. The magnetic pieces have a magnetic inside the rubber but exposed at either end of the strip.
- Start with one of the long pieces (magnetic for your lock jamb, compression for your hinge jamb) and push the flange (thin edge) into the groove in the jamb down at the sill (or threshold). Since weatherstrip shrinks a little over time, push the weatherstrip down tight against the sill, as this is the point we do not want to leak. Use a wood block or any other smooth hard object to seat the weatherstrip as you work your way up the jamb
- Use a utility knife to cut the excess at the top
- Repeat the procedure for the other vertical jamb, then install the short weatherstrip piece into the head jamb, cutting the excess with a utility knife
- Now go outside the door, armed with a putty knife. Close the door and check to be sure the weatherstrip is making good contact all around. Where it is not, use the putty knife to move the weatherstrip out from the jamb a little to get good contact with the door.
B. Corner Seal
- After installing weatherstripping, open door and pull the weatherstripping away (~4-6 inches) from the corner where you are going to install the pad
- Remove adhesive backing from pad
- Press corner pad against jamb, tucked behind weatherstripping and with the thinner leading edge pointed towards the door and the thicker portion of the pad nestled behind the weatherstripping (see picture below)
- Press weatherstripping back into position, using a wooden block to insert into kerf and a putty knife to adjust outwards as needed
Special cases/FAQ
- I have steel jambs/my kerf is ~1/4”/the Pease weatherstripping barb is too small to fit the kerf in my door jambs
- Weatherstripping is no longer available for ¼” kerf sizes. Some customers have had success with using caulking and electrical tape to build up the kerf on 1/8 barb weatherstripping so that it can fit ¼” kerf
- I don’t see any kerf or slot/my weatherstrip has been stapled/caulked into place
- Most of the time you just need to pull away the old weatherstripping to see the kerf. Sometimes debris or paint is covering the kerf. In some cases (very old doors) there is no kerf. In this case you can staple on new weatherstripping, add kerf with a small saw/Dremel, or replace the door/jambs.
- I have double doors, how do I order/how do I get a long head jamb strip?
- Just order two sets – anytime more than 1 set is ordered we include the head jamb pieces as 83” segments (uncut)
- I have double doors with a vertical piece in the center (this is called an “astragal”), can I replace the rubber strip in that piece?
- We do not carry this part - we recommend having a handyman take a look and see if they can come up with a custom solution for you.
- Is the standard weatherstripping available in white?
- No – but we do offer the high reach weatherstripping in white and it is a great replacement/upgrade
- I have an 8’ (96”) tall door, what do I do?
- Order two sets and splice as needed
- I just installed this new weatherstripping and my door won’t close/is difficult to close
- First check to make sure the lock and hinge side weatherstripping weren’t swapped – if the magnetic weatherstripping is installed on the hinge side then the magnetic can prevent the door from closing fully
- If the weatherstrip has been installed correctly, then typically the issue is a combination of the new weatherstrip breaking in and the old weatherstrip having worn out. After a couple weeks, the new weatherstrip should settle down and the door should close smoothly yet firmly.
- If after a few weeks the door is still very difficult to close, your door may be out of alignment. Try tightening and shimming hinges as needed. If all else fails, swap the old weatherstripping back in or consider replacing the door.