

Door Glass and Frames Buying Guide
Key Diagrams/Pictures
Most common glass sizes:

Door glass & frame kit (includes the insulated glass “IG” unit, the interior and exterior plastic door glass frame, screws, and screw caps):

Cross section of clear insulated glass unit:

Cross section of 3 pane decorative glass unit:

Purpose/Function
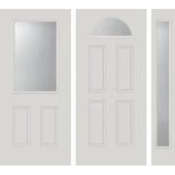
Adding or upgrading door glass is the best way to immediately boost the curb appeal and value of a home. Door glass also helps an entryway bring light into the home and allows you to see outside without opening the door. Door glass comes in a range of styles including clear, decorative, internal mini-blinds, grills between the glass, venting, and frosted or opaque. These styles provide a range of privacy, aesthetics, and functionality to an entryway. Decorative door glass is most often found in front entry doors. Clear glass, glass with blinds, venting glass with a removable screen, and glass with internal bars or grills are typically used for side doors, patio doors, kitchen doors, and man-doors to a garage or shed.
Door glass is most often found in exterior doors. However, some interior doors do have single pane glass (for example pantry doors or French doors with 15 lite style for a living room or dining room). Glass on interior doors can help a room feel larger, provide increased visibility, and can be a safety feature by reducing the chance of opening a door into someone on the other side!
Material/Construction
Modern door glass for exterior doors is double or triple paned for energy efficiency and tempered for safety. Door and side lite glass is required by law to be tempered. Some glass is laminated for additional security or severe weather resistance. Low-e or low-emissivity glass has a special coating that can help improve energy efficiency by reflecting non-visible light. In cold weather, low-e glass reflects heat back inside the home. In warm weather, low-e glass reflects solar heat off of the outside of door glass and helps to keep the interior of the home cool. In general, the largest energy efficiency gain comes from switching from single pane glass to double pane insulated glass. Then switching to thicker glass or triple paned glass will drive significant energy savings, and the savings from low-e glass declines. We only advocate for low-e glass in extreme climates and with very large pieces of glass that receive direct sunlight.
The vast majority of modern door glass is easily replaceable and held into doors or sidelites with plastic or vinyl frames. These frames screw together and clamp or sandwich glass into the door or side lite. This style of securing door glass into a door is sometimes called "lip-lite." The exterior frame seals against the outside face of the door with a bead of caulking and the frame seals against the exterior pane of glass with another bead of caulking, together creating a tight seal. The interior frame is the one with the screw holes and after the glass & frames are installed and the screws are tightened, caps cover the screw heads on the interior frame.
Door glass frames are typically made of plastic or vinyl (wood is rare/only found on very old doors). Plastic is the most common and comes in several types with different advantages/weaknesses:
- PC/ABS blend: Medium/high expense. Excellent durability and resistance to impact. Takes paint/stain very well without any primer needed. Best option for handling “high heat” or direct sunlight, especially if your door is behind a storm door that traps heat or is painted black and tends to get hot.
- ABS: Very rigid but prone to cracks under force, medium expensive, takes paint/stain well. Can handle moderate heat/sunlight. Typically used on lower quality decorative door glass.
- Polypropylene (glass filled): Less expensive, moderate durability and heat/sun resistance. Can be painted or stained after using a primer that is for use with plastics/for use with polypropylene.
- Polypropylene (talc filled): Very cheap, low durability the tendency to crack at the corners. Can handle moderate heat/sunlight. Can be painted or stained after using a primer that is for use with plastics/for use with polypropylene.
- Polystyrene: Very cheap, was used from ~1970 through the 1990s. Cracks, warps, discolors easily, especially if in direct sunlight.
- Vinyl: The most durable & expensive. Can be painted/stained but doesn’t take paint/stain as well as ABS or PC/ABS. Can handle direct sunlight well.
Except for vinyl frames, which are extruded and stapled together, the other door glass frames (the plastic ones) are made in large injection molds.
Insulated door glass units are made by taking two pieces of tempered glass (sometimes with a third piece of decorative glass in between them), installing an aluminum spacer around the edges of the glass, and then sealing the unit with a strong sealant (typically a black rubber-like substance called butyl and/or other sealants like polysulfide, etc.). To prevent condensation on the inside of the glass, drying beads or “desiccant” lines the inside of the aluminum spacer and absorbs excess moisture. Sometimes a thin, flexible metal tube protrudes through the sealant. This tube is for equalizing the pressure inside the unit if the unit is built at a low altitude and installed at a high altitude or vice versa. Insulated door glass comes in three standard thicknesses: ½” thick (typically for clear glass/glass with external grills), ¾” thick (very rare, used for some decorative door glass mare around ~1970-1985), and 1” thick (standard for decorative glass and glass with internal blinds). When replacing the door glass frames and keeping the existing glass, it is critically important to measure the glass thickness and select the frame designed for that glass thickness (i.e., a frame for 1” glass won’t fit a ½” piece of glass, even if the width and height are correct).
Decorative door glass often has “caming,” or inlaid metal. Caming typically comes in 3 colors or finishes: black (also known as lead or patina), silver (also known as nickel or satin nickel), and brass. Today, most caming is made of zinc with different finish colors. Recently, decorative glass with wrought iron caming has become popular. Of course, glass with “lead” caming in no longer made with actual lead due to the safety and environmental complications of lead. In addition to caming, decorative glass typically has some combination of etched, frosted, hammered, beveled, patterned, or glue-chip glass.
Older doors (typically pre-1970) may have single pane door or door glass that is held into the door with wood trim (sometimes called “sticking”) and nails that is flush to the face of the door. Glass installed into a door in this fashion (without a screw-together plastic or vinyl frame) is known as “flush glazed.” Some very high end (mostly premium wood doors) still use a “sticking” method or “flush glazing” method to install door glass. Interior doors that have glass are typically flush glazed. See image below for a comparison of lip lite to flush glazed. Note that sometimes lip-lite style products can be used to replace a flush glazed unit, as long as the cut-out dimensions match.

Our product offering
Note: All of our door glass and frame kits are designed for exterior doors that are 1.75” thick
Decorative Door Glass
- Traditional styles (e.g., Stratford, Wexford, Saxon, etc.)
- Modern styles (e.g., Connecticut, Paxton, Portland, Austin, etc.)
- Wrought iron styles (e.g., Charleston)
- Decorative door glass is typically 1” thick (measuring the full unit -- two clear panes sandwiching a decorative pane)
Door Glass with Internal Blinds
- Internal blinds are a great option for controllable privacy and light, without the hassle of external blinds that tangle and break (internal blinds use a magnetic operator that is very durable and reliable – the blinds themselves are protected in between the panes of glass)
- Blinds can be raised/lowered and tilted (except the 7x64 size which is tilt only)
- Glass is 1” thick
Hurricane Impact & Security Glass
- Some parts of the country (e.g., Florida & Texas) have requirement for door glass to be able to withstand certain storm/wind/projectile impacts
- Door glass installed in these areas must meet requirements (e.g., Miami Dade County or FL15419 code approval – seefloridabuilding.org)
- Clear glass and select decorative styles are available in hurricane impact rated with high-impact vinyl frames. Hurricane glass is expensive, with prices 3-5x that of standard glass.
- Hurricane glass comes with added benefit of security glass (significantly enhances resistance to break-ins) as well as sound reduction (laminated glass provides significant sound-proofing)
Clear Door Glass
- We offer a broad variety of clear door glass sizes and external grills or divider options
- Clear glass (no dividers) gives a more modern look
- Clear glass with external grids or grills gives an iconic, traditional look
- Glass is typically ½” thick (some select clear styles are 1” thick
Glass with Internal Grills (also known as “grids” or “dividers” or “grilles”)
- Modern look & easy to clean (because you don’t have to clean around external grids)
- Available with white or bronze internal grids (tan and black also available for special order)
Venting Door Glass
- Great for a kitchen or side door where airflow (e.g., to let in a nice breeze on a summer day or to let out the smoke/smells from cooking) is desired
- Two insulated glass units (fixed one up top and a sliding one below) – you can slide the window open. Includes a removable screen.
- Materials: We offer door glass frames in only high quality materials. In general, our decorative glass options and frames for 1” thick glass are typically PC/ABS. Frames for ½” glass (and the frames on our clear glass product offering) is typically the high quality glass-filled Polypropylene. Some sizes (typically less common sizes) use high-quality vinyl frames.
- Shapes/Sizes (see measuring door glass down below): We offer door glass frames in rectangular, oval, round top, arch top, and fanlite shapes
- Colors: We offer white and tan frames. Tan frames are only available for 1” thick glass in select shapes/sizes. We recommend tan frames if you plan to stain your door glass frames because the tan base will require fewer coats of stain to reach the desired color. However, PC/ABS white frames can be stained easily (you just might need an extra coat or two to reach the desired color)
- Profile: Most of our frames have a profile known as an “R” profile or a colonial or traditional profile (see picture below). Flat (also known as shaker or quaker or craftsman) profile frames are becoming more popular and are offered with our craftsman style door glass and on select decorative styles.


Traditional “R” Frame Shaker Flat Frame
Replacement cycle
Door glass should be replaced every 10-15 years, or as desired for a new look. Often times the door slab itself is in great shape but decorative door glass can look dated or tired. Fresh glass and a new coat of paint for the door will result in a door that looks brand new at a small fraction of the cost of replacing the entire door system. This makes door glass replacement an excellent project when renovating a home or preparing a home for sale/going on the real estate market.
We also often help with glass replacements when:
- The insulated glass unit seal fails and the glass becomes fogged/filled with condensation
- The glass is broken (e.g., a rock from a lawnmower, someone accidentally bumps the glass, or the glass is broken in a forced entry)
Door glass frames should be replaced if they become warped, cracked, chipped, discolored, or otherwise broken. The polystyrene frames installed on many older doors crack and deteriorate within ~2-5 years, and even faster in direct sunlight. New frame materials hold up much, much better but still require replacement every 8-15 years, depending on exposure to sunlight, the elements, and normal wear and tear. Often, full lite door glass frames can become cracked or broken at the bottom as a result of pets pawing or chewing on the frames.
Installation instructions
- Door Glass Installation(see video)
- Remove screw caps to expose screws (should be on the inside of the home, if installed properly). If the caps are painted over and difficult to remove, try a small flathead screwdriver and mallet/hammer to cut or knock them free.
- Use a utility knife to score around the interior and exterior door glass frames to cut through any existing paint
- With a friend outside holding the glass firmly into the door, remove screws. If screws strip out, try a stripped screw tool or you can use a drill to drill out the screws
- Remove interior frame
- Remove exterior frame and glass unit
- Clean the opening
- Place the new glass unit & exterior frame assembly into the cut-out opening. The exterior frame does not have screw holes and typically comes pre-caulked to the insulated glass unit. Install this assembly from the outside of the home.
- While a friend holds the exterior frame and glass unit into the door from outside of the home, attach the interior frame (the one with screw-holes)
- Fasten screws tightly (no harder than a good twist by hand, set power drills to lowest torque setting, do not exceed 15 in-lbs of torque)
- Cover screws with provided screw caps (if no caps are available, you can also use white putty and smooth over with your thumb, then add wood grooves with a fingernail)
- Door Glass Frames Installation Instructions
Remove your old door glass and frames from your door
- Remove screw caps to expose screws (should be on the inside of the home, if installed properly). If the caps are painted over and difficult to remove, try a small flathead screwdriver and mallet/hammer to cut or knock them free.
- Use a utility knife to score around the interior and exterior door glass frames to cut through any existing paint
- With a friend outside holding the glass firmly into the door, remove screws. If screws strip out, try a stripped screw tool or you can use a drill to drill out the screws
- Remove interior frame
- Remove exterior frame and glass unit
Prepare your glass and door
- Clean the opening in the door
- Remove caulking from your glass (and clean from the face of the door). We recommend Goo Gone if you have sticky or stubborn caulking
- Clean your glass with Windex and let dry for at least 20 minutes
- If your new outside (exterior) plastic frame (the side without the holes for screw caps) is pre-caulked, skip this step. Otherwise, add a bead of silicone caulk (available in our accessories section) to where the exterior door glass frame seals with the exterior pane of glass. Then add a bead of caulk to where the exterior door glass frame seals with the exterior face of the door.
- Within 10 minutes of applying caulk to the exterior door glass frame, press the frame down onto the glass (glass should be laid flat on risers like a block of wood with a towel to allow the frames to fully seat onto the glass). Push glass and exterior frame together and wipe any excess caulking that squeezes out
- Let caulking sit (preferably for a few hours or overnight) to harden. This will make installation into the door easier as the glass and frame will slide less, however this step is not required
Install into door
- Install the new glass unit & exterior frame assembly into the cut-out opening. Install this assembly from the outside of the home.
- While a friend holds the exterior frame and glass unit into the door from outside of the home, attach the interior frame (the one with screw-holes)
- Fasten screws tightly (no harder than a good twist by hand, set power drills to lowest torque setting, do not exceed 15 in-lbs of torque)
- Cover screws with provided screw caps (if no caps are available, you can also use white putty and smooth over with your thumb, then add wood grooves with a fingernail)
- Finishing (painting or staining) Door Glass Frames
NOTE: We do recommend using painters tape and painting the frames prior to installation (painting on a flat surface prevents running)
White Polypropylene Frames (see instructions in box – will say “white frames” and not have a tan dot in the upper right hand corner)
- Your frame is maintenance free and does not require painting.
- If you choose to paint this frame follow below steps with frames at room temperature:
- First lightly sand frames and clean with mild detergent mixed with water. Let dry.
- Next, apply adhesion promoting primer made for use with polypropylene. We recommend: Sherwin-Williams UPO 7228 Low VOC Adhesion Promoter – clear plastic adhesion promoter, Rust-Oleum Brands 249058 White Ultra Cover 2X Enamel Spray Primer, PPG SXA 1050 plastic adhesion promoter, or BASF R-M AM865 plastic adhesion promoter.
- After primer dries, apply thin coats of an exterior grade acrylic latex paint. Let paint dry completely between coats. Apply clear top coat at paint manufacturer’s recommendation.
- CAUTION: Apply paint in a well-ventilated area and follow all paint manufacturer's cautions, warnings and instructions.
PC/ABS Frames & Vinyl Frames (see instructions in box – will say “primed tan/white frames” and will have a tan dot in the upper right hand corner)
- Painting
- First clean with mild detergent mixed with water. Let dry. No other surface prep needed.
- With the frames at room temperature, apply an exterior grade acrylic latex paint in thin coats, allowing the paint to dry completely between coats. Apply clear top coat at paint manufacturer’s recommendation.
- CAUTION: Apply paint in a well-ventilated area and follow all paint manufacturer's cautions, warnings and instructions.
- Staining
- First clean with mild detergent mixed with water. Let dry. No other surface prep needed.
- Next, with the frames at room temperature, apply an opaque base coat of exterior grade acrylic latex paint. Let dry completely.
- Apply the stain, work it into the grain with a sponge or cloth, and then wipe off the excess stain. Continue applying coats of stain until you are satisfied with appearance.
- Apply clear top coat at paint manufacturer’s recommendation.
Special cases/FAQ
- My glass/frames measures about 2” narrower than what I saw on the website
- This is a narrow size and is typically used on narrow doors (i.e., 30” wide and narrower). Most styles are available in the NARROW size (see our “Other Sizes” section). Some decorative & other styles can be special ordered in this size as well.
- After I installed the new glass/frames some caulking oozed out onto the glass/door—what do I do?
- If the caulking is still wet, wipe clean with a damp cotton rag. It the caulking is too sticky for that then use a plastic putty knife to scrape off the excess and then use goo-gone to clean up any residuals.
Appendix:
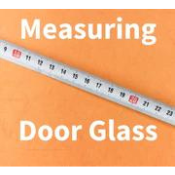
How to measure your door glass to select the correct size for your door
First we recommend to check your door thickness. Most doors measure 1 3/4" in thickness. Our Glass & Frame Kits fit doors that are within 1/16" of 1 3/4" thickness.
Glass Size vs. Cut-out size vs. Outside Frame Size - what's the difference?
Each door has three measurements. The first is the size of the glass, for example 22" wide by 36" tall. The next measurement is called the cut-out or "opening" in the door where the door glass is inserted. This measurement is 1" larger in width and height than the glass, so in this case the cut-out would measure 23" wide by 37" tall. If you are adding glass to a door that does not currently have glass, or if you are expanding the opening in a door to allow for a larger size glass, the cut-out is a key measurement. Finally, the outside frame measurement (see below) is an inch or so wider than the cut out, and since the frame is visible it is the easiest measurement to do. Remember, your actual glass size will be about 2" narrower and shorter than your frame measurement.
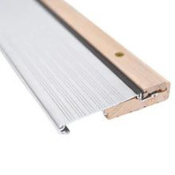
- Outside Frame Measurement (actual glass size will be 2" narrower & shorter than outside frame measurement)
Measure the outside length and width of your existing frames (see picture above). Measure along the face of the door from the outside corner to outside corner of the frame (width and height, not diagonally). Frames that measure up to ½” shorter or narrower will work fine (the profile of door glass frames has changed slightly over the years but the actual glass sizes have remained consistent). However, if the existing frame measures more than ¼” larger than the replacement frame the replacement likely will not fit. We also recommend measuring the glass directly and confirming exact measurement for oval frames, as oval frame profiles have varied significantly over the years.
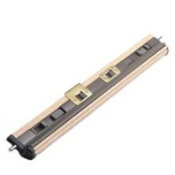
- Glass Thickness Measurement (for replacement frame kits, not necessary if you are purchasing a kit that includes the glass)
Measure the exact overall thickness of your insulated glass insert (the full "sandwich" of both pieces of glass and the gap of insulating air in between). You will need to unscrew enough of the interior frame to squeeze a tape measure in between the frames to determine the glass "sandwich" thickness. Usually a measurement can be taken after unscrewing around a corner of the inside frame -- not the entire frame. The glass "sandwich" will measure either 1/2", 3/4" or a full 1". If your glass is 3/4", you will have to replace the glass and the frame assembly, since frames for 3/4" glass thickness are discontinued. However, the vast majority of glass is either 1/2" or 1" thick. Most of the time (but not always!) double pane clear or etched glass is 1/2" thick. Decorative "triple glazed" or glass with two clear pieces sandwiching a decorative third piece of glass (often with metal caming inlaid), is typically 1" thick. It can be hard to judge the thickness of your glass without measuring, so we strongly recommend removing screws from one of the top corners of your existing frame and using a small ruler to measure the glass thickness.