SKU: SE-6PT-3679-PRW-SED

Steel Edge Entry Door - 6 Panel (36" x 80")

Regular price $460.00

20 Year Ltd. Warranty full policy

Check width, height, and depth. Smartfit Measuring Guide

Slab Size
Surface Texture: Primed White Smooth

Built to order in 4-6 weeks

Ships freight on a pallet shipping policy

30 Day Return Policy (except if modified) return policy

Description

Classic Six Panel Steel Door Built for Lasting Performance

The 6 Panel steel-edge steel entry door features a classic six-panel layout with traditional raised molding, creating a timeless and versatile appearance. Built with 24-gauge galvanized steel skins and steel-edge perimeter with threaded hinge mounting points for adjustable hinges, this door is well suited for multi-family, rental, and metal jamb applications. This door ships factory-primed and ready for painting in any exterior color. A strong choice for traditional, transitional, and contemporary homes where durability and low maintenance are priorities.

6 Panel Design with Traditional Panel Detailing

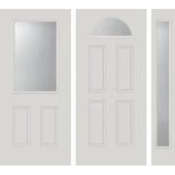
The 6 Panel configuration features a classic arrangement of six panels organized in a balanced pattern with smaller upper panels, tall center panels, and medium lower panels. This traditional layout has been widely used in residential architecture for generations and delivers a timeless appearance that works well across colonial, traditional, and transitional home styles.

Doors without glass provide maximum privacy and enhanced security, making this solid-panel design a dependable choice for front entrances, side doors, garages, and utility applications where visibility control and durability are priorities. The upper four panels can also be cut out to accept a half lite glass insert, adding natural light while preserving the two lower panels and traditional proportions.

Each panel features detailed edge profiles designed to create depth and shadow lines similar to those found in traditional wood door construction. The varied panel proportions add architectural character and visual depth to the door surface.

Key Measurements

Key Measurements & Sizing Information

This door is sold as a nominal 36" x 80" size, which is also commonly written as 3/0 x 6/8. The actual slab size is 35-3/4" wide x 79" tall, with a standard exterior door thickness of 1-3/4".

If purchasing with jambs to assemble a single prehung unit: this slab size typically pairs with a 36" head jamb. For inswing thresholds and saddle-style outswing thresholds, the matching leg jambs are 81-3/4", creating an assembled unit size of approximately 37-1/2" x 81-3/4" when using standard 3/4" jamb thickness. For bumper-style outswing thresholds, the leg jambs are 80-3/4", creating an assembled unit size of approximately 37-1/2" x 80-3/4".

If purchasing slab only to replace an existing door slab and keep your current frame: a 79" slab is the most common exterior slab height and is often the preferred choice even when the existing door measures 79-1/8" or 79-1/4" tall. In many replacement situations, a small height difference at the bottom can be addressed using an adjustable U-style door sweep, helping maintain proper sealing and smooth door operation within the existing frame. If your existing door measures a full 36" wide, is taller than 79-1/4", or measures exactly 36" x 80" (common with older wood doors), we also offer a line of oversize trimmable doors available in select styles.

Door Prep

Door Prep Options

Door prep refers to how the door slab is machined for hinges and lock hardware. We offer three options:

  • Without prep (blank): no machining, ready for field preparation
  • Standard prep: machined to common residential hinge and lock placements, and matched to the framing and jamb sets we offer for complete door systems
  • Custom prep: hinge and lock locations machined to exactly match your existing door

If your existing door is prepped to specifications other than our standard layout, we recommend selecting custom prep so the new slab matches your existing door. See the diagram in the image gallery for a visual reference of standard hinge and lock placement.

Standard Hinge Prep

Standard hinge prep includes three hinge mortises on the hinge edge of the door, located as measured from the top of the door:

  • Top hinge: 6-1/2" from top
  • Middle hinge: 37-1/2" from top
  • Bottom hinge: 68-1/2" from top

For Slab Only orders, standard hinge prep is reversible. The mortises are machined completely through the edge of the door so hinges can be mounted from either direction, allowing left-hand or right-hand swing installation without additional routing. This type of reversible hinge prep is compatible with 4" hinges in 5/8" radius (quarter-round), 1/4" radius (dime-round), or square corner profiles. Complete Door System orders come with standard hinge prep locations but will be mortised as hinge pockets to match selected swing and hinge shape.

Standard Lock Prep

Standard tubular lock prep is machined for a 2-3/8" backset lockset and includes two 2-1/8" bore holes spaced 5-1/2" apart. Each bore is centered 2-3/8" from the edge of the door:

  • Deadbolt bore (upper): centered 40-3/8" from top of door
  • Latch bore (lower): centered 45-7/8" from top of door
Construction & Materials

Steel-Edge Steel Construction: Built for Strength and Low Maintenance

Our steel-edge steel doors feature 24-gauge galvanized steel skins bonded to a polyurethane foam core, with a spruce/pine/fir wood perimeter reinforced by 22-gauge steel edge plates. The steel edge plates eliminate exposed wood at the door edges, providing improved dimensional stability, moisture resistance, and a tighter long-term seal against the frame compared to traditional wood-edge construction.

A pine lock block provides solid hardware support at the lock location. The exterior steel surfaces are factory-primed with a polyester-based coating and ready for painting, delivering a smooth finish that protects against corrosion while allowing the door to be customized to match your home.

Adjustable Hinge Mounting: Easy Alignment Without Removing the Door

Steel-edge doors feature threaded hinge mounting points built into the steel edge plates at standard hinge locations. This design allows 4" surface-mounted hinges to be attached with machine screws and adjusted up to 5/8" vertically and 1/8" in or out without removing the door from the opening. This makes initial installation easier and allows for ongoing adjustments as the building settles or seasonal conditions change. For property managers and multi-family applications, adjustable hinge mounting simplifies routine maintenance and helps maintain a weather-tight seal over time.

20-Minute Fire Rating for Code-Compliant Applications

Steel-edge steel doors carry a 20-minute fire rating tested to positive pressure standards when properly installed as part of an approved fire-rated assembly. This makes them a suitable choice for applications where fire-rated openings are required by building code, including garage-to-house separations, multi-family residential units, utility rooms, and stairwell entries.

Where Steel-Edge Doors Are Commonly Used

Steel-edge construction is commonly chosen for applications where dimensional stability, low maintenance, and fire rating are priorities. Typical applications include:

  • Multi-family residential buildings and condominiums
  • Rental properties and property management portfolios
  • Garage-to-house fire-rated openings
  • High-humidity or high-moisture environments
  • Applications paired with metal jamb systems
  • Projects requiring adjustable hinge mounting for ongoing maintenance
Finishing

Surface Texture and Recommended Finish for Steel Doors

Steel doors feature a smooth, factory-primed surface that provides a clean, uniform base ready for painting. The primed steel surface accepts paint evenly and delivers a refined, professional finish suited for a wide range of exterior color choices.

Before painting, lightly sand the primed surface with 120 to 220 grit sandpaper to promote paint adhesion, then wash the door with a mild detergent and water to remove dust, sanding residue, and any oily film from shipping or handling. For heavier cleaning, a TSP (trisodium phosphate) solution can be used. Rinse thoroughly and allow the surface to dry completely before painting. Apply a high-quality exterior-grade acrylic latex paint suitable for metal surfaces according to the paint manufacturer's instructions.

All six sides of the door must be finished, including the front, back, top, bottom, and both edges, to protect the steel from moisture exposure and reduce the risk of corrosion. Steel doors are designed to be painted and are not intended to be stained. When selecting paint colors for doors exposed to direct sunlight, lighter to medium shades are typically recommended, as very dark colors can increase surface temperatures and may affect long-term finish performance.

The factory primer is not designed as a permanent topcoat. Finishing should be completed promptly after installation and before prolonged exposure to weather to ensure proper protection of the door surface.

Installation

Installation Readiness for Steel Door Slabs

Steel door slabs are designed for installation into existing door frames or for assembly into new prehung units. Before installation, verify that the slab dimensions (width, height, and thickness) match the existing slab for replacements, or the jamb set for new assemblies.

When replacing an existing slab, the original door can often be used as a template. Align the existing door on top of the new slab to transfer hinge locations and hardware positions for accurate placement.

Steel door slabs should not be trimmed. Steel doors are manufactured to precise dimensions, and cutting the door may expose internal materials or compromise the structural integrity and finish of the door.

Steel doors are heavy and should be handled by two or more people during installation. Use care when handling to avoid scratches or dents to the primed steel surface, as exposed steel must be properly sealed to prevent corrosion.

Steel doors ship factory-primed and should be painted promptly after installation to protect the surface and maintain long-term performance.

For complete step-by-step installation instructions, refer to the full installation guide available in the Resources section below.